blog.calder.dev

I run a few services on my homelab, a small computer in my apartment. This means that I am subject to the whims of my residential internet service provider (ISP), who may change the IP address assigned to my router at any time.

I've been getting around this issue for years by using the integrated dynamic DNS service provided by my router's manufacturer. Many router manufacturers provide this service, letting you register some subdomain name which will be set to whatever IP address the router happens to be assigned, and update periodically.

My router happens to be made by TPLink, so my dynamic DNS records are of the form something.tplinkdns.com. Here's what my dynamic DNS settings look like in the router settings:
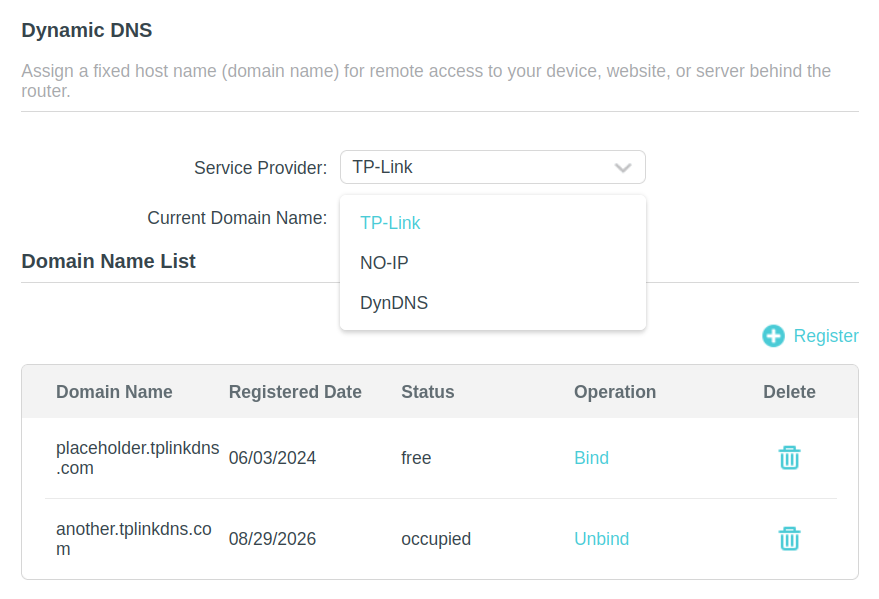
Screenshot of TPLink router Dynamic DNS configuration page

With dynamic DNS configured, I can then create a CNAME record for my apartment which points to the dynamic DNS record, which lets me have a nice memorable name in my own DNS space. Then, I can create other CNAME records for particular services (such as this blog) which point to that record, and everything resolves nicely.

Everything fine, until it wasn't

As mentioned above, I've been running a homelab for years this way, with no issue. When I move apartments, I plug the router back in, it gets a new IP, updates the dynamic DNS, and everything Just Works™.

The primary service in my homelab is Nextcloud, through which I self-host file syncing, contacts, calendar, notes, tasks, podcasts, and various Nextcloud apps. I'm rather reliant on these services, especially contacts and calendar, which sync to all my devices. My desktop and laptops all use the excellent GNOME Online Accounts integration as well as Thunderbird. My phone syncs via the DAVx5 app, which then populates the system contacts and calendar databases for other apps to use.

I use the Nextcloud snap, which means since I initially installed it and set it up years ago, it just automatically updates itself in the background and I basically never need to touch it. Twice I've noticed that it had been a while since updates, logged in, and saw that recent auto-refresh attempts had failed. After poking around a bit, I figured out that the bundled redis service was unhappy, so I restarted it, and the refresh proceeded as expected — a year or so later, the same issue happened again, so the fix was easy. All this is to say, I'm quite used to everything running as usual in the background, without issue.

Then a few days ago, I got a notification on my phone from AntennaPod failing to authenticate to the gpodder sync from my Nextcloud podcasts service. And when I booted up my work laptop on Monday, I got a warning from Thunderbird about expired security certificates for my nextcloud server, and after allowing the exception for the known good cert which happened to have expired, I received an endless series of pop-ups to confirm the exception. The pop-ups are always drawn overtop the usual Thunderbird window, which made catching up on emails an excercise in window management. Not ideal.

In short, my SSL certificate for my nextcloud server had expired, and it was getting in my way. So it was time to figure out why the certificate had stopped being autorenewed.

What happened?

I use certbot to manage all my SSL certificates, along with an nginx reverse proxy. When I want to set up a new service, I create the new nginx config file, set up the DNS record, and then run sudo certbot --nginx and select the domain and enable auto-renew. After that, certbot runs in the background, renewing certificates before they expire.

So why did my certs just expire?

I shelled into the machine which runs the reverse proxy and checked the certbot logs:

Aug 29 12:37:12 forum certbot.renew[480332]: All renewals failed. The following certificates could not be renewed:
Aug 29 12:37:12 forum certbot.renew[480332]:   /etc/letsencrypt/live/mysubdomain.mydomain.com/fullchain.pem (failure)
Aug 29 12:37:12 forum certbot.renew[480332]:   /etc/letsencrypt/live/another.mydomain.com/fullchain.pem (failure)
Aug 29 12:37:12 forum certbot.renew[480332]:   /etc/letsencrypt/live/differentdomain.com/fullchain.pem (failure)
Aug 29 12:37:12 forum certbot.renew[480332]:   /etc/letsencrypt/live/yetanotherdomain.com/fullchain.pem (failure)
Aug 29 12:37:12 forum certbot.renew[480332]: 4 renew failure(s), 0 parse failure(s)
Aug 29 12:37:12 forum systemd[1]: snap.certbot.renew.service: Main process exited, code=exited, status=1/FAILURE
Aug 29 12:37:12 forum systemd[1]: snap.certbot.renew.service: Failed with result 'exit-code'.
Aug 29 12:37:12 forum systemd[1]: Failed to start snap.certbot.renew.service - Service for snap application certbot.renew.
Aug 29 12:37:12 forum systemd[1]: snap.certbot.renew.service: Consumed 2.106s CPU time.

Hmm, not good, but unclear why. Let's try running sudo certbot --nginx interactively:

- - - - - - - - - - - - - - - - - - - - - - - - - - - - - - - - - - - - - - - -
Processing /etc/letsencrypt/renewal/mysubdomain.mydomain.com.conf
- - - - - - - - - - - - - - - - - - - - - - - - - - - - - - - - - - - - - - - -
Renewing an existing certificate for mysubdomain.mydomain.com

Certbot failed to authenticate some domains (authenticator: nginx). The Certificate Authority reported these problems:
  Identifier: mysubdomain.mydomain.com
  Type:   dns
  Detail: DNS problem: SERVFAIL looking up A for mysubdomain.mydomain.com - the domain's nameservers may be malfunctioning; DNS problem: NXDOMAIN looking up AAAA for mysubdomain.mydomain.com - check that a DNS record exists for this domain

Hint: The Certificate Authority failed to verify the temporary nginx configuration changes made by Certbot. Ensure the listed domains point to this nginx server and that it is accessible from the internet.

Failed to renew certificate mysubdomain.mydomain.com with error: Some challenges have failed.

- - - - - - - - - - - - - - - - - - - - - - - - - - - - - - - - - - - - - - - -
All renewals failed. The following certificates could not be renewed:
  /etc/letsencrypt/live/mysubdomain.mydomain.com/fullchain.pem (failure)
  /etc/letsencrypt/live/another.mydomain.com/fullchain.pem (failure)
  /etc/letsencrypt/live/differentdomain.com/fullchain.pem (failure)
  /etc/letsencrypt/live/yetanotherdomain.com/fullchain.pem (failure)
- - - - - - - - - - - - - - - - - - - - - - - - - - - - - - - - - - - - - - - -
4 renew failure(s), 0 parse failure(s)
Ask for help or search for solutions at https://community.letsencrypt.org. See the logfile /var/log/letsencrypt/letsencrypt.log or re-run Certbot with -v for more details.

Okay, that's more interesting. NXDOMAIN? That stands for nonexistent domain. But strange, I can still connect to the server from outside my home network — I can ping it, ssh into it, even view the corresponding webpages if I force http instead of https. So the domain must exist.

The tool to look up DNS records is nslookup. Running this tool on the nextcloud subdomain reveals:

nslookup mysubdomain.mydomain.com
Server:		127.0.0.53
Address:	127.0.0.53#53

Non-authoritative answer:
mysubdomain.mydomain.com	canonical name = landing.mydomain.com
landing.mydomain.com	canonical name = something.tplinkdns.com.
Name:	something.tplinkdns.com
Address: <my real IP>
** server can't find something.tplinkdns.com: NXDOMAIN

What? It clearly resolved to my real (redacted) IP address, how can it not find the domain? I tried this on another domain that I own which is hosted on a VPS outside my network, and it worked, with the only notable difference being the lack of the last “server can't find ...: NXDOMAIN” line.

So that means something must be wrong with dynamic DNS provided by TPLink: it's able to resolve to the correct IP address, but it reports NXDOMAIN. Perhaps it's time to stop relying on my router's free dynamic DNS service.

What to do?

After some searching on DuckDuckGo for “self-host dynamic DNS”, I found that there are lots of options. Various sites provide hosted dynamic DNS sites, and separately there are various clients for interacting with them and other DNS providers.

Generally, there are two approaches:

  1. Sites which provide services similar to TPLink's dynamic DNS, where you register some custom name, then the service creates a subdomain for you, which you periodically poll to update.
  2. Sites which to which you grant direct access over your DNS records, either for your whole domain or a particular slice of subdomains.

Neither of these is particularly appealing to me. Relying on a free dynamic DNS service is exactly how I got into this problem in the first place, so I'd rather not do that again. And I already manage DNS records well through my domain registrar, I don't really want to split out DNS management between two services.

But it looks like my domain registrar (which happens to be Cloudflare) does provide API access for clients to manage dynamic DNS. So I just need a compatible client.

I ran snap search ddns, and one of the first results was a package called inadyn, which I noticed was packaged by Snapcrafters, which is an organization I trust with members I know personally. I checked out the source for the package, then found my way to the upstream inadyn project. Unfortunately, the project was archived a year ago, but fortunately, it seems to be well-known, feature complete, robust, and have a provider for my DNS provider.

The latest/edge channel of the inadyn snap has the most recent changes, though the default latest/stable seems to have been neglected for some years before that. snap info inadyn shows:

name:      inadyn
summary:   Internet Automated Dynamic DNS Client
publisher: Snapcrafters✪
store-url: https://snapcraft.io/inadyn
contact:   https://github.com/snapcrafters/inadyn/issues
license:   GPL-2.0+
description: |
  Inadyn is a small and simple Dynamic DNS, DDNS, client with HTTPS support.
  Commonly available in many GNU/Linux distributions, used in off the shelf
  routers and Internet gateways to automate the task of keeping your Internet
  name in sync with your public¹ IP address. It can also be used in installations
  with redundant (backup) connections to the Internet.

  This snap is maintained by the Snapcrafters community, and is not necessarily endorsed or
  officially maintained by the upstream developers.
snap-id: HsYllvdShtMn4CWCWIuL9nksNo2UM1te
channels:
  latest/stable:    2.7    2020-04-14 (335) 2.63MB -
  latest/candidate: ↑
  latest/beta:      ↑
  latest/edge:      2.13.0 2025-10-25 (793) 2.02MB -

That's fine, I'll use latest/edge, and ask the Snapcrafters to promote it to stable. Now to get it configured with access to my DNS provider...

Setting up DNS access

As mentioned, my DNS provider happens to be Cloudflare, for historical reasons. It seemed better than domains.google.com at the time, and checks notes I was correct. These days I would obviously look elsewhere, but migration is a pain, so I'm still using Cloudflare.

That aside, I see in the inadyn documentation that there's a provider for Cloudflare, and the configuration looks something like this:

# Create a unique custom API token with the following permissions:
# -> Zone.Zone - Read, Zone.DNS - Edit.
provider cloudflare.com {
    username = zone.name
    password = api_token_important_read_comment
    hostname = hostname.zone.name
    ttl = 1 # optional, value of 1 is 'automatic'.
    proxied = false # optional.
}

So I'll need an API token. Some searching around led me to this page, which has no useful information on how to set up dynamic DNS access, though it did link to Cloudflare's DNS API docs with one important snippet of information for later:

A/AAAA records cannot exist on the same name as CNAME records.

I then found this other page, which was similarly useless. Finally, I found the page to actually manage Cloudflare API tokens. It looks something like this, which I assume is similar for other dynamic DNS providers:
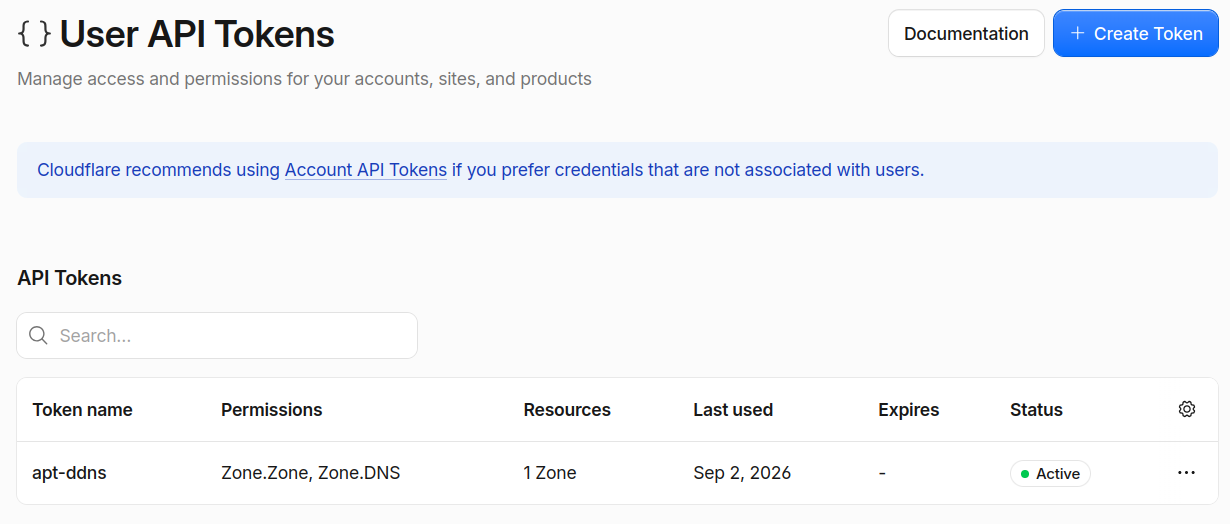
Cloudflare's User API Tokens landing page

Clicking “Create Token”, I was then led to a page to select a template for the token:
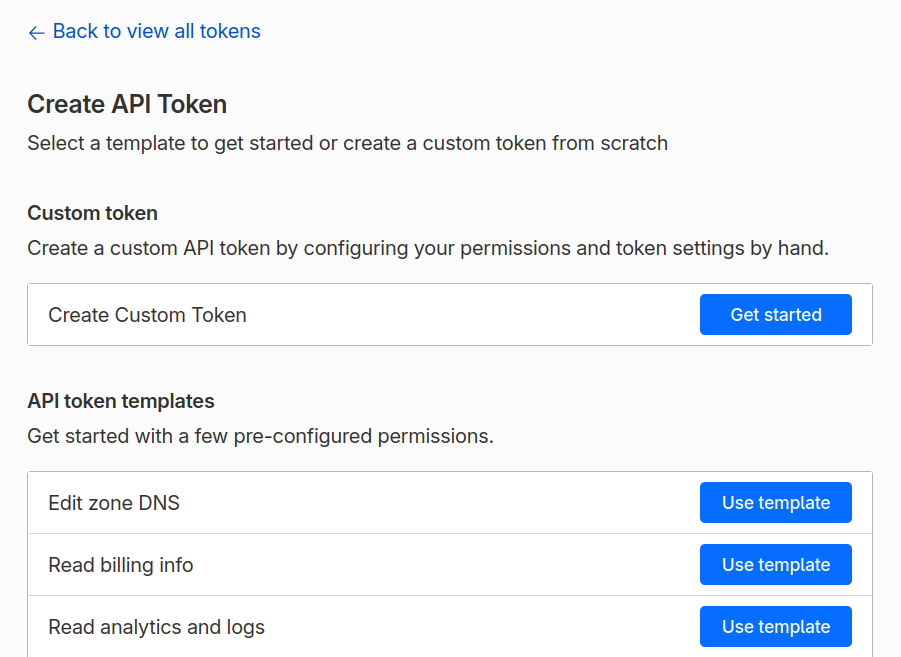
Cloudflare's Create API Token page with custom token and template options

Lastly, after selecting “Edit zone DNS”, I got to the page where I could actually configure the token details as instructed in the inadyn README. The important pieces:

  • Grant “Read” permission for “Zone”
  • Grant “Edit” permission for “DNS”

Confusingly, there's also a dropdown for “Account”, “Zone”, or “User”. “Zone” there refers to scoping the access to a particular domain, rather than all domains associated with an account or user. The “Zone Resources” section similarly lets you restrict the token to accessing a particular “zone” (domain).

So when filled out fully, it should look something like this:
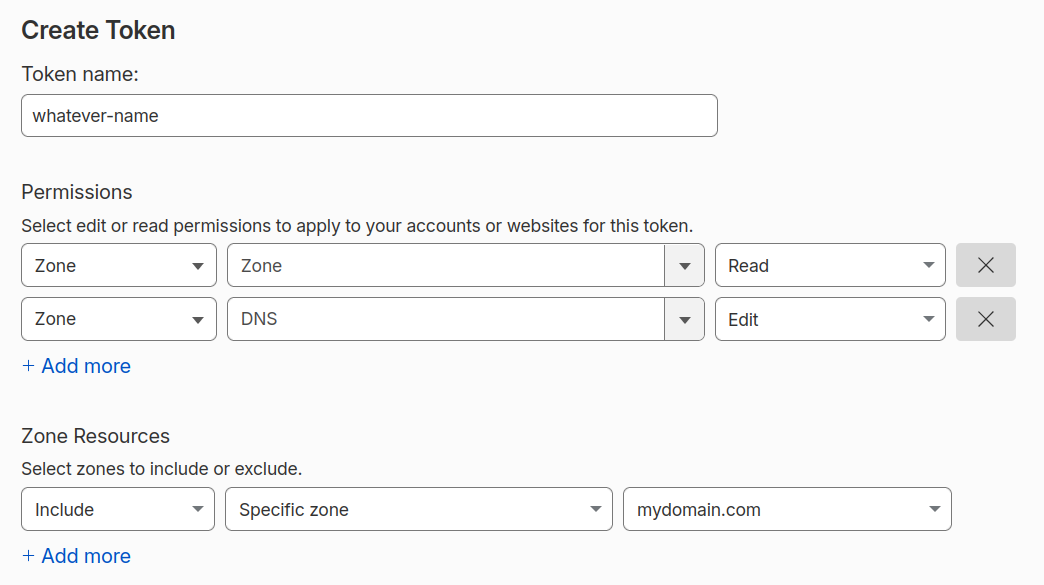
Cloudflare's Create Token configuration page

Finally, continue to summary, create the token, and keep the page open while I set up inadyn.

Setting up inadyn

Now that I had the access token ready, it's time to install and configure inadyn. On my server, that's just a matter of running:

sudo snap install --channel=latest/edge inadyn

(Again, I'm hoping the edge build will be promoted to stable shortly, as the project is archived and this build corresponds to its finished state.)

Now to write the config file. Running snap info inadyn reveals that it has two commands:

commands:
  - inadyn.configpath
  - inadyn

Great, seems I should write the config to the path given by inadyn.configpath. Except:

[I] oac@forum ~> inadyn.configpath
/var/snap/snapcraft/15950/inadyn.conf

Hmm, that certainly doesn't look right.

Earlier, when I first found the inadyn snap, I was looking through its snapcraft.yaml and saw something fishy:

      echo "#!/bin/bash" > $SNAPCRAFT_PART_INSTALL/bin/configpath
      echo "echo $SNAP_DATA/inadyn.conf" >> $SNAPCRAFT_PART_INSTALL/bin/configpath

Seems I was right, and there is indeed a bug in the snapcraft.yaml definition. The $SNAP_DATA environment variable is being evaluated by snapcraft at build time, rather than by inadyn at runtime. No matter, the fix is simple enough.

The path ought to be /var/snap/inadyn/current/inadyn.conf. So I opened that path via sudo vim /var/snap/inadyn/current/inadyn.conf, and put the following there:

# Create a unique custom API token with the following permissions:
# -> Zone.Zone - Read, Zone.DNS - Edit.
provider cloudflare.com {
    username = mydomain.com
    password = <my api token>
    hostname = landing.mydomain.com
    ttl = 1 # optional, value of 1 is 'automatic'.
    proxied = false # optional.
}

After saving the file, I then ran sudo snap restart inadyn to restart the service. However, I checked the logs to see if it succeeded, and saw some errors:

[I] oac@forum ~> sudo snap logs inadyn
2026-09-03T01:47:39Z inadyn[555295]: HTTP 400: Cloudflare says our request was invalid. Possibly a malformed API token.
2026-09-03T01:47:39Z inadyn[555295]: Fatal error in DDNS server response: DDNS server response not OK
2026-09-03T01:47:39Z inadyn[555295]: Error response from DDNS server, exiting!
2026-09-03T01:47:39Z inadyn[555295]: Error code 48: DDNS server response not OK
2026-09-03T01:47:39Z systemd[1]: snap.inadyn.daemon.service: Main process exited, code=exited, status=48/n/a
2026-09-03T01:47:39Z systemd[1]: snap.inadyn.daemon.service: Failed with result 'exit-code'.
2026-09-03T01:47:39Z systemd[1]: snap.inadyn.daemon.service: Scheduled restart job, restart counter is at 5.
2026-09-03T01:47:39Z systemd[1]: snap.inadyn.daemon.service: Start request repeated too quickly.
2026-09-03T01:47:39Z systemd[1]: snap.inadyn.daemon.service: Failed with result 'exit-code'.
2026-09-03T01:47:39Z systemd[1]: Failed to start snap.inadyn.daemon.service - Service for snap application inadyn.daemon.

Cloudflare is returning an error code 400.

I checked my API token and the username and hostname, and all are correct according to the example. But then I remembered that note from the Cloudflare API docs:

A/AAAA records cannot exist on the same name as CNAME records.

For ease of management, my DNS records previously looked something like this:

CNAME mysubdomain.mydomain.com  -> landing.mydomain.com
CNAME otherservice.mydomain.com -> landing.mydomain.com
CNAME thirdservice.mydomain.com -> landing.mydomain.com
CNAME landing.mydomain.com      -> something.tplinkdns.com

All services hosted on my homelab had CNAME records pointing to the same subdomain (something like landing.mydomain.com), which in turn I could point at whatever provides my real IP address, such as TPLink's dynamic DNS service. If that changes, it's easy for me to change the single record to point wherever it needs to.

However, I hadn't yet adjusted my DNS records since trying to set up inadyn, so that CNAME record still existed, which violates the note from the Cloudflare docs. I deleted the DNS record for landing.mydomain.com from Cloudflare DNS, and then restarted inadyn via sudo snap restart inadyn. This time, everything worked as expected:

[I] oac@forum ~> sudo snap logs inadyn
2026-09-03T01:49:23Z systemd[1]: Started snap.inadyn.daemon.service - Service for snap application inadyn.daemon.
2026-09-03T01:49:23Z inadyn.daemon[555511]: ERROR: ld.so: object '/snap/inadyn/793/lib/libsnapcraft-preload.so' from LD_PRELOAD cannot be preloaded (cannot open shared object file): ignored.
2026-09-03T01:49:23Z inadyn[555511]: In-a-dyn version 2.13.0 -- Dynamic DNS update client.
2026-09-03T01:49:23Z inadyn[555511]: Guessing DDNS plugin '[email protected]' from 'cloudflare.com'
2026-09-03T01:49:23Z inadyn[555511]: Update forced for alias landing.mydomain.com, new IP# <my real IP>
2026-09-03T01:49:23Z inadyn[555511]: Updating IPv4 cache for landing.mydomain.com

(I'll ignore that ld.so error for now, probably another minor snapcraft.yaml packaging issue.)

Let's confirm that nslookup is actually happy now:

[I] oac@forum ~> nslookup mysubdomain.mydomain.com
Server:		127.0.0.53
Address:	127.0.0.53#53

Non-authoritative answer:
mysubdomain.mydomain.com	canonical name = landing.mydomain.com
Name:	landing.mydomain.com
Address: <my real IP>

Excellent! So now all that's left is to finally renew my certificates.

Renewing SSL certificates via certbot

Certbot will auto-renew certificates on a timer, but the nslookup is finally working, I want to renew certs immediately and be done swatting away security pop-ups.

Since I already have previous certificates configured for the services running on my homelab, all I need to do is run:

sudo certbot renew

After waiting rather a long time for certbot to perform the required challenges to confirm that each of the domains to renew has DNS records pointing to this machine, it finally succeeds.

The pop-ups stay gone, and I can visit my Nextcloud domain in a browser via https. All is well. And now, I'm not reliant on a free dynamic DNS service which may cease to work in the future. I control my own DNS, and I know how to change it in the future, if need be.

And now, so do you.

My name is Oliver Calder and I am part of the Snapd team at Canonical. In this post, I'm excited to share some more information about a project I've been working on over several years with a talented group of people across the AppArmor, Desktop, Design, and Snapd teams: Permissions Prompting.

Permissions Prompting is a new layer of user-defined security which empowers users to control at runtime the level of access applications have to the host system.

There was an excellent post from around the 24.10 cycle which introduced Permissions Prompting. Since then, we've made many improvements across the stack, and we're excited to ship Prompting in an Ubuntu LTS release for the first time with the newly-released 26.04 Resolute Raccoon. While still in an experimental state, we're looking forward to gathering feedback from new users as we continue to add functionality and refinement over the coming cycles.

In this new post, I want to share some more details about the motivations, design, and implementation of Permissions Prompting.

Intro to AppArmor and Snap Interfaces

Before digging into the details of Permissions Prompting, I want to give some background about the existing security systems on which Permissions Prompting builds.

Ubuntu and several other Linux distributions use a Linux Security Module called AppArmor to mediate application permissions. In short, each application which is confined by AppArmor has a profile containing rules which explicitly enumerate the files, networking, and other permissions to which the application has access. If there is no rule allowing a particular operation, AppArmor intercepts and blocks that operation at runtime.

AppArmor profiles are a key piece of security for snaps (and increasingly, classic .deb packages on Ubuntu as well). By default, snaps have access to their own sandbox and a minimal set of system resources from the host system. However, many applications need broader permissions in order to function as intended, such as a photo editor accessing files in the user's home folder or a streaming client communicating over the network.

When someone creates a snap, they can use snap interfaces to specify the permissions required by their application. Snapd then uses these interface definitions to add additional rules into the snap's AppArmor profile, thus granting those permissions.

Why Prompt?

Most Snap interfaces provide fine-grained control over a particular category of system access, like access to cameras or a particular block device. However, some interfaces grant broader permissions in order to ensure compatibility between the application and the user's individual setup.

The archetypal example of this is the home interface, which grants access to most files and folders in the user's home directory. This interface is used by many applications such as office suites, photo editors, and music players, allowing the user to work with whatever files they need, regardless of how they choose to organize their home directory.

The purpose of Permissions Prompting is to provide the user with an extra level of control and peace of mind about the permissions of applications running on their system. For particular interfaces, if an application tries to access a resource allowed by that interface, rather than automatically allowing that access, the user is instead presented with a prompt describing the access attempt and asking whether they would like to allow or deny that access.

As a user, you thus have the ability to audit what applications are trying to do and control what and when they may access. If a video editor attempts to read a .mp4 file in your Videos folder, you can reply and by allowing that application to always have access to files in your Videos folder. If you're using a video call application, you can grant it access to your camera for the rest of your session, and you will get another prompt if it tries to access your camera again in the future. If a chat app starts snooping around your Documents folder, you can block that access for now or forever — and have the chance to think about whether it's really something you want to keep on your system.

Architecture of Permissions Prompting

There are three main pieces of software which work together to provide Permissions Prompting.

The first is AppArmor, which runs in the kernel and is responsible for intercepting applications' attempts to access the system and matching them against AppArmor rules in the application's profile. When prompting is enabled, snapd adds a prompt prefix to certain allow rules in applications' profiles. When an application performs an operation which matches one of those rules, then instead of immediately allowing the operation to proceed, AppArmor creates a request and sends it to the second component: snapd.

Snapd receives the request from AppArmor and first checks whether there is an existing prompting rule (not the same as an AppArmor rule) which applies to the request. Rules can be created either as the result of a reply to a prompt or added directly by the user. If an existing rule matches the request, then snapd automatically sends back a response to the kernel. If there is no rule which applies, then snapd creates a prompt and notifies the prompting client.

The prompting client is the third piece of the prompting system. When it receives the notice from snapd that there is a new prompt, it retrieves the prompt via the snapd REST API. It then opens a dialog box presenting the user with a description of the request and various options for how they wish to handle it.

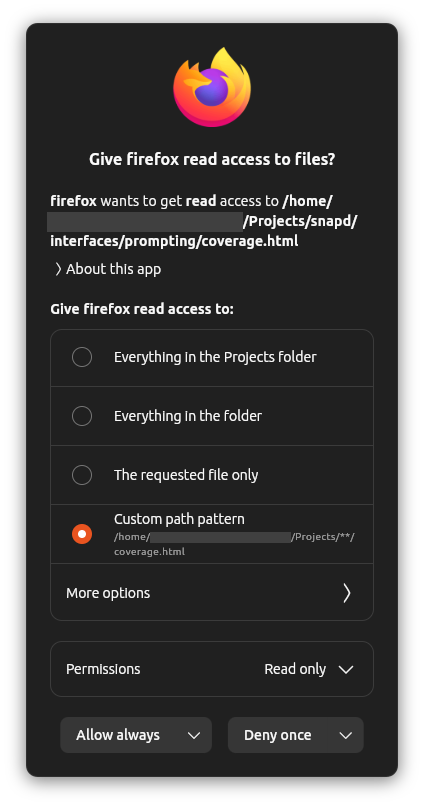
A prompt for GIMP to access a PNG file in Pictures, with the "All PNG files" option selected with Read, Write A prompt for Firefox to access a Go coverage summary, with a custom path pattern allowing any coverage file in Projects

The user selects whether they want to allow or deny the request, the particular permissions they wish to allow or deny, how long they want that decision to apply, and (for some interfaces) the specific path(s) for which the decision should apply.

The prompting client then sends the reply back to snapd. If the user selected a reply duration other than “once”, then snapd creates a new rule which it will use to match against future requests. Next, snapd sends a response back to AppArmor. Lastly, AppArmor receives the response and either allows or denies the pending operation, and the application carries on.

Portals and Permissions Prompting

I can hear some of you asking already: doesn't this sound a lot like Portals? In some ways, yes. We want to give users the same level of control available via Portals even when their applications were not developed to use Portals. The primary goal of prompting is to respect user intent while raising the bar for security across all applications.

XDG Desktop Portals provide standardized APIs which applications can use to request various actions on the host system. For example, they can open a file picker using the native toolkit of your desktop environment, or present a window chooser pop-up when an application requests to share your screen.

When an application uses a portal, the user explicitly chooses what they would like the application to do, so their intent is clear and they remain in control. Access via portals is proxied by the portal backend and does not hit the usual interface-specific AppArmor rules associated with Permissions Prompting. Thus, users should not be presented with Permissions Prompting prompts for actions taken via portals.

For applications which do not use portals, that's where Permissions Prompting comes in. Many applications still do not use portals, or only use portals for particular actions. Portals require specific API calls within the application, so the developer must explicitly program their application to use them.

Permissions Prompting is designed to be a universal system which works for all applications without any action required from the developer. We want users to have greater control over the applications running on their system, regardless of how those applications were developed.

How Far Have We Come, What's New in 26.04?

Permissions Prompting was first launched as an experimental feature in Ubuntu since 24.10. The initial implementation focused on the home interface, which enables the user to have granular control over the files and directories they would like each application to be able to access.

In 25.04, we made lots of UX improvements, including making rules idempotent and intent-based, merging rules with the same path pattern and supporting different outcomes and lifespans for each permission within a given rule, caching snap icons locally to be displayed in prompts without network requests to the store, and persisting outstanding prompts across snapd restarts by reclaiming requests from AppArmor after snapd restarts.

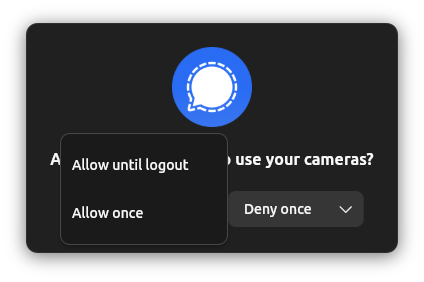
In 25.10, we added better integration between prompts, the application windows, and the desktop shell, we improved the default prompt responses and reduced repeated prompts, we added the ability to create rules and reply with decisions which last until the user logs out, and we extended prompting to include the camera interface, which required huge refactors and generalizations throughout the stack to now support multiple interfaces with different prompt and rule contents and semantics.

A prompt to allow signal-desktop to use your cameras, with drop-down showing "Allow until logout" and "Allow once"

With 26.04, we're shipping a beautifully-redesigned Prompting Client UI, further refinement of the UX of replying “Allow/Deny Once” thanks to new AppArmor features, and support for the audio-record interface. Unlike home and camera, the audio-record interface is a marker interface which does not define AppArmor rules but is instead checked directly by WirePlumber when an application tries to use an audio stream. Adding prompting support for audio-record involved some clever changes within WirePlumber itself to ensure a seamless connection flow while querying the snapd API to ask whether that application should be allowed access to the microphone. On the snapd side, we added that new API endpoint and now handle incoming requests from both AppArmor and the API in parallel, all while maintaining the same resilience guarantees and UX consistency as before. And of course, the Design and Desktop teams crafted the UI for microphone prompting in the Prompting Client and Security Center.

A prompt to allow audacity to use your microphones

How Do I Use It?

Permissions Prompting is available now on Ubuntu 26.04 LTS! Additionally, thanks to the portable nature of snaps, prompting and most of the features discussed above are available on all Ubuntu releases going back to 24.04.

To use it, please ensure you have the following snaps installed (these should be preinstalled on Ubuntu 24.10 and later):

  • desktop-security-center — this manages Permissions Prompting and TPM-backed full-disk encryption
  • prompting-client — this is responsible for listening for and presenting prompts to the user and communicating with snapd

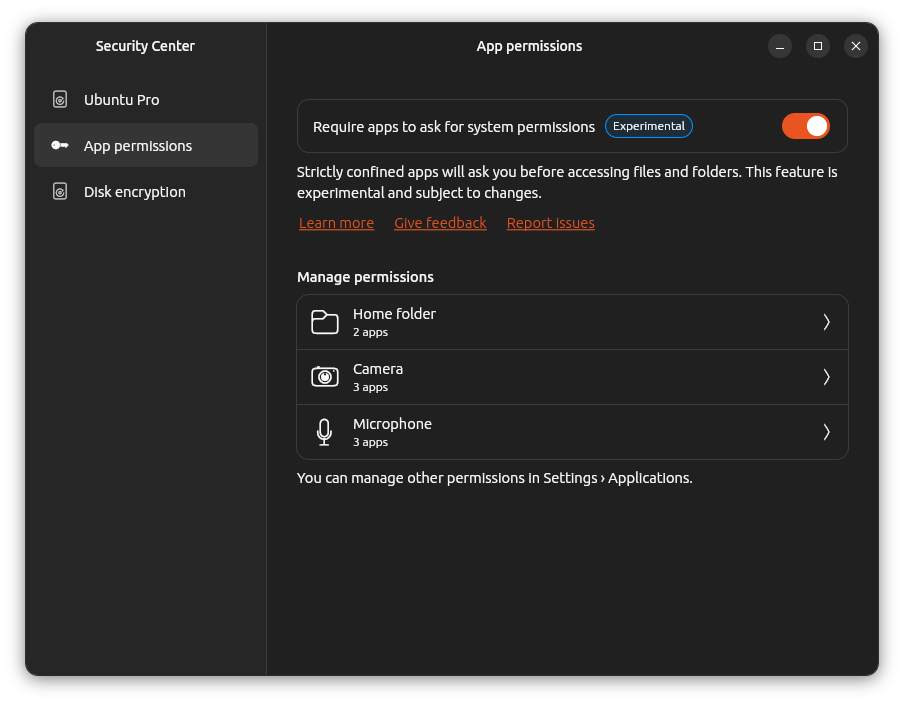
To enable prompting, open the Security Center application and click the toggle in the App Permissions panel labeled “Require apps to ask for system permissions”.

A screenshot of the Security Center App Permissions window with toggle to enable Permissions Prompting

Then, log out and log back in again (so WirePlumber knows to ask for microphone access) and you're ready to give prompting a try!

We welcome any feedback you have for us as we continue to improve and evolve Permissions Prompting. Please feel free to share your experience with us using the following links:

In Conclusion

This post has covered a lot of ground! Thanks for sticking around :)

To summarize, I first introduced AppArmor and snap interfaces and discussed the motivations for adding Permissions Prompting on top of those existing systems. I then presented an overview of how prompting works and how it relates to XDG Desktop Portals. Finally, I discussed the progress we've made, what's available now in Ubuntu 26.04 LTS, and how you can try out prompting today.

I'm already planning a follow-up blog post going into even deeper detail on some topics related to Permissions Prompting, in particular the communication flows between AppArmor and snapd and between snapd and the prompting client, 3rd party prompting clients, how audio-record prompting works under the hood, the logic for matching prompts against rules, and how prompting for arbitrary (potentially non-snap) applications might work. If you have any questions about Prompting, I'd love for you to send them my way and I'll do my best to answer them as well.

As I said above, the goal of Permissions Prompting is to give users even greater control over their systems, raising the bar for security and user privacy for all applications. This is one of many initiatives we're undertaking to drive forward the Linux Desktop and shape the future of Ubuntu, and I hope you'll join us for the ride. Thank you for your time, and I'll see you in the next one.

I've been hacking away at some work work today in Go, and I've come to a startling, albeit not particularly surprising realization about safety and mutability of slices.

Consider the following trivial example:

a := []int{0, 1, 2, 3, 4, 5, 6, 7, 8, 9}
b := a[3:7]
// a: []int{0, 1, 2, 3, 4, 5, 6, 7, 8, 9}
// b: []int{3, 4, 5, 6}

We start with a slice a, then we construct b as a subslice over a. No allocations occur (ignoring the slice header), and none are needed.

But what about if we start mutating b?

a := []int{0, 1, 2, 3, 4, 5, 6, 7, 8, 9}
b := a[3:7]
b[2] = 42
// a: []int{0, 1, 2, 3, 4, 42, 6, 7, 8, 9}
// b: []int{3, 4, 42, 6}

Okay, fine, I was asking for it. This is well-known and reasonable, since mutating an element in an existing slice definitely should not reallocate anything in the slice. Mutating an element of b thus has the side effect of mutating a as well

But what if we try to append instead?

a := []int{0, 1, 2, 3, 4, 5, 6, 7, 8, 9}
b := a[3:7]
c := append(b, 42)
// a: []int{0, 1, 2, 3, 4, 5, 6, 42, 8, 9}
// b: []int{3, 4, 5, 6}
// c: []int{3, 4, 5, 6, 42}

sigh... Ouch, this one hurts a bit more. So if we append to a slice which is itself a subslice of another slice, the newly-appended value mutates the original slice.

I don't like this, but I don't really see another reasonable option, either. Since append() can result in an allocation, it would make some sense that for consistency/safety, rather than mutating an array which is shared by multiple slices, the append() just reallocated a new slice. However, I don't see a way this is possible without the runtime the compiler being able to check whether the original slice will ever be used again (which some languages do, but Go does not in this way). Checking this at runtime would be probably impossible in Go, and definitely cursed.

What if we try to append a slice of items instead of just one item?

a := []int{0, 1, 2, 3, 4, 5, 6, 7, 8, 9}
b := a[3:7]
c := append(b, []int{11, 12, 13}...)
// a: []int{0, 1, 2, 3, 4, 5, 6, 11, 12, 13}
// b: []int{3, 4, 5, 6}
// c: []int{3, 4, 5, 6, 11, 12, 13}

More of the same, it seems. At least it's consistent....

One last try: what happens if we append a slightly longer slice?

a := []int{0, 1, 2, 3, 4, 5, 6, 7, 8, 9}
b := a[3:7]
c := append(b, []int{0, 1, 1, 2}...)
// a: []int{0, 1, 2, 3, 4, 5, 6, 7, 8, 9}
// b: []int{3, 4, 5, 6}
// c: []int{3, 4, 5, 6, 0, 1, 1, 2}

muffled screaming

This is upsetting to me. Here, we've appended a slice which would extend beyond the capacity of original slice, and as a result, rather than overwriting elements of the original slice, it allocates a new slice and leaves the original untouched.

This means that to know whether an append() will cause some other slice to be mutated, you need to know the capacity of the slice to which you're appending (as is always the case), and to know whether the array which backs the slice to which you're appending is referenced by any other slices.

The cap() function does exist to tell you the capacity of a slice, but in the Go code I've seen, it's rarely if ever used. And as far as I know, the Go language doesn't expose any way to identify whether an operation (append() or directly mutating some slice) will mutate memory referenced from some other variable, and if so, if that variable will be used again in the future.

The bigger picture

In short, the possibility of mutating one slice by appending to another feels like a pretty big footgun to me. If the only safe way to use append() is to explicitly copy() or check cap(), then it seems like the compiler should enforce this in some way.

None of this is really a revelation, it's more of an acknowledgement of reality or an invitation to check myself when I start to feel a bit too comfortable with Go's “ease-of-use”.

After writing Go for the past two years, it's increasingly clear to me that Go is excellent for simple code that's easy to write and read. And big projects which insist on that simplicity, potentially at the expense of optimal performance, can be exceptionally pleasant to maintain and onboard new contributors.

But performance optimizations can cause Go code to grow in complexity more quickly than other languages, in my experience. Part of this is because Go feels like a small language, with a simple syntax and basically all data structures built from structs, maps, and slices. If you need something better-optimized for your use case, you're probably going to need to build it yourself. Which can be fun, but can also end up messy.

But another piece is that safe performance optimizations often rely on enforcing and then relying on constraints and assumptions around data. For example, assuming a slice is pre-sorted, or ensuring data can/cannot be mutated or referenced elsewhere. Compared to other modern languages, Go provides fewer facilities to encode these constraints and assumptions aside from comments, which are the responsibility of the programmer to read and enforce.

Nightmare fuel

What really scares me, though, is that the compiler might make optimizations which happen to break assumptions which the programmer thought they put in place.

For example, the Go compiler doesn't expose a way to grow the size of a slice (akin to realloc in C), and this functionality was only recently added to the Go standard library. The canonical way to grow a slice s has been the following (as is used in slices.Grow):

s := []int{1, 2, 3}
growBy := 20
s = append(s[:cap(s)], make([]int, growBy)...)[:len(s)]

This looks like it would make two allocations: one for the inner make(), then one for the append(), since we're deliberately appending beyond the capacity of the slice. However, as noted in the source code only one allocation occurs. The Go compiler is clever.

What I'm afraid of is that compiler might get clever in a situation like this:

var a []int
b := []int{1, 2, 3}
c := append(a, b[:2]..., 4)

If the compiler decided that since a didn't point to any array on disk yet, it could just point c to the existing b, but the programmer was relying on changes to c never mutating b, this would be a huge problem.

Thankfully, the Go compiler doesn't do this (and probably never will). The zero value of a slice has a capacity of 0, so any append() to it should ensure an allocation, and never reuse the slice which is being appended.

Sometimes Go makes me second guess things like that, though.

Go can be a nice blend of the “simplicity” of Python and the... “simplicity” of C. More often then not, I think it's an excellent tool for the job. But from time to time, it can make me feel like https://duckduckgo.com/?q=i'm+in+danger+meme

This is the first entry in a new blog I'm hosting with writefreely. I'm currently running it in a lxd container on my homelab, though I'm interested in packaging it as a snap. Doing so would make it easy to install on Linux without the need to manual unpack the release tarball, with automatic updates, and with security sandboxing without the complexity/overhead of running in a container or VM.

I plan to write up my experience in creating the snap here on blog.calder.dev, and I'll switch over to using the snap instead of a manual install.

After that, I have some fun things in the works...

Plans (in no particular order):

  • Write up a complete guide for setting up Nextcloud on a home server, from blank hardware to full configuration, reverse proxy, DNS/network settings, and SSL certs
  • Migrate my home server to use ZFS for bulk data storage, and figure out whether ZFS storage pools for snap data or running everything through lxd is more convenient (and write it up, of course)
  • Set up a high-availability MicroCloud cluster on the trio of Dell Wyse 5070 thin clients I just bought for cheap, and migrate this blog and some other services to them to run (and write up the process here)
  • Finish the MVP for a Rust project I've been working on for my homelab (and maybe yours, too) and write about it here

So stay tuned, I hope to have more for you soon!